“如何创建一个兼容模型云 Ikoula”的版本间的差异
| (未显示同一用户的1个中间版本) | |||
| 第1行: | 第1行: | ||
<br />这篇文章是从由软件进行自动翻译。你可以[[:fr:Comment creer un modele compatible Cloud Ikoula|看到这篇文章的源代码]]<br /><span data-translate="fr"></span><br /> | <br />这篇文章是从由软件进行自动翻译。你可以[[:fr:Comment creer un modele compatible Cloud Ikoula|看到这篇文章的源代码]]<br /><span data-translate="fr"></span><br /> | ||
| + | <span data-link_translate_fr_title="Comment creer un modele compatible Cloud Ikoula" data-link_translate_fr_url="Comment creer un modele compatible Cloud Ikoula"></span>[[:fr:Comment creer un modele compatible Cloud Ikoula]][[fr:Comment creer un modele compatible Cloud Ikoula]] | ||
<span data-link_translate_he_title="איך ליצור מודל תואם ענן Ikoula" data-link_translate_he_url="%D7%90%D7%99%D7%9A+%D7%9C%D7%99%D7%A6%D7%95%D7%A8+%D7%9E%D7%95%D7%93%D7%9C+%D7%AA%D7%95%D7%90%D7%9D+%D7%A2%D7%A0%D7%9F+Ikoula"></span>[[:he:איך ליצור מודל תואם ענן Ikoula]][[he:איך ליצור מודל תואם ענן Ikoula]] | <span data-link_translate_he_title="איך ליצור מודל תואם ענן Ikoula" data-link_translate_he_url="%D7%90%D7%99%D7%9A+%D7%9C%D7%99%D7%A6%D7%95%D7%A8+%D7%9E%D7%95%D7%93%D7%9C+%D7%AA%D7%95%D7%90%D7%9D+%D7%A2%D7%A0%D7%9F+Ikoula"></span>[[:he:איך ליצור מודל תואם ענן Ikoula]][[he:איך ליצור מודל תואם ענן Ikoula]] | ||
<span data-link_translate_ro_title="Cum pentru a crea un model compatibil nor Ikoula" data-link_translate_ro_url="Cum+pentru+a+crea+un+model+compatibil+nor+Ikoula"></span>[[:ro:Cum pentru a crea un model compatibil nor Ikoula]][[ro:Cum pentru a crea un model compatibil nor Ikoula]] | <span data-link_translate_ro_title="Cum pentru a crea un model compatibil nor Ikoula" data-link_translate_ro_url="Cum+pentru+a+crea+un+model+compatibil+nor+Ikoula"></span>[[:ro:Cum pentru a crea un model compatibil nor Ikoula]][[ro:Cum pentru a crea un model compatibil nor Ikoula]] | ||
2017年2月9日 (四) 10:50的最新版本
这篇文章是从由软件进行自动翻译。你可以看到这篇文章的源代码
fr:Comment creer un modele compatible Cloud Ikoula
he:איך ליצור מודל תואם ענן Ikoula
ro:Cum pentru a crea un model compatibil nor Ikoula
ru:Как создать совместимый модель облачных Ikoula
pl:Jak utworzyć zgodnego modelu Cloud Ikoula
ja:雲 Ikoula の互換性のあるモデルを作成する方法
ar:كيفية إنشاء نموذج متوافق مع "عكلة سحابة"
zh:如何创建一个兼容模型云 Ikoula
de:Wie erstellen Sie ein kompatibles Modell Cloud Ikoula
nl:Hoe maak een compatibel model Cloud Ikoula
it:Come creare un modello compatibile Cloud Ikoula
pt:Como criar um modelo compatível nuvem Ikoula
es:Cómo crear un modelo compatible nube Ikoula
en:How create a compatible model Cloud Ikoula
下面的过程说明如何创建一个模型与兼容 公共云 或 私有云 从零开始安装 (从 iso).
在我们的示例中,我们创建一个 GNU 图像/Linux Fedora 22.
登录到 管理接口 :
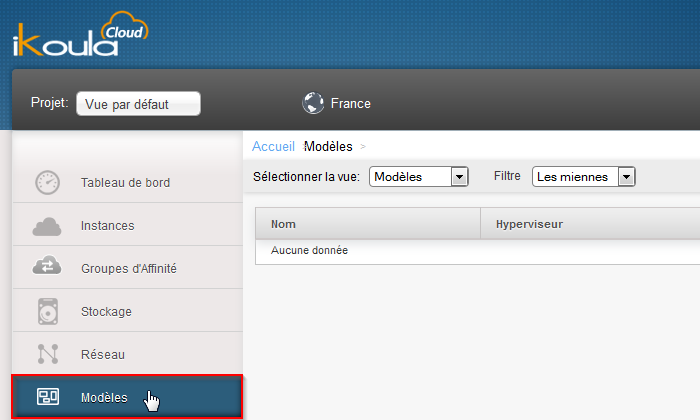
单击 "模型" 在左边的菜单 :
选择视图 "ISO" :
单击按钮 "保存 ISO" :
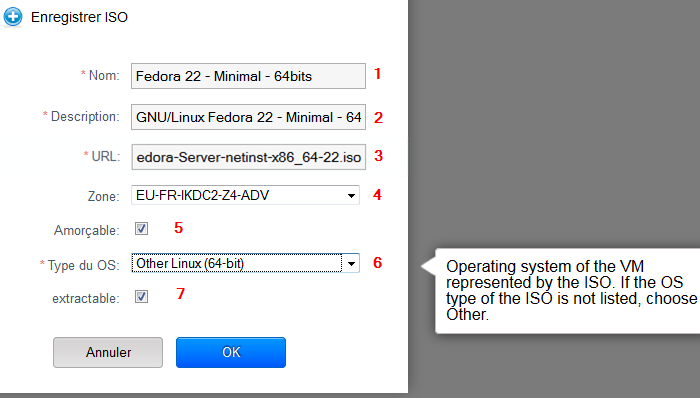
然后填写的字段 :
- 输入你想要为你的图像的名称 ;
- 输入你的形象的描述 ;
- 输入 / 粘贴 URL HTTP (没有 https) 完整的 ISO 文件 ;
- 选择你的形象将对其可用的云 Ikoula 区域 ;
- 选中此框,如果你想要一个实例,以便能够从您的 ISO 引导 ;
- 指定您的 ISO 系统的类型,如果您的系统和它的版本是在列表中选择它,否则请选择类型之一 "其他 xxx" 最合适。在我们的例子,Fedora 22 不是我们所以选择的列表中的可用 "其他 Linux (64-位)" ;
- 选中此框,如果您希望您的 ISO 下载一次创建。
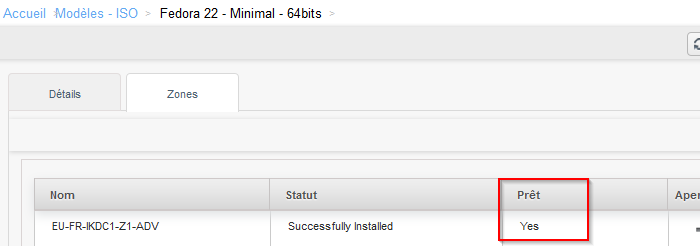
一旦您的 ISO 注册,等到它要么在状态 "贷款 : 是的" :
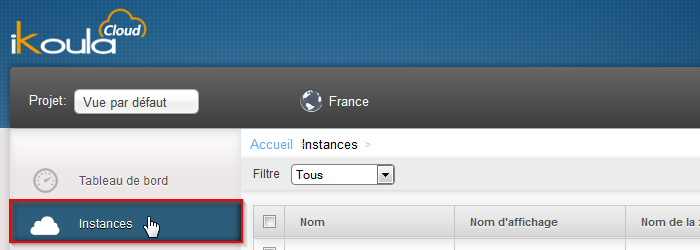
单击 "实例" 在左边的菜单 :
单击按钮 "添加实例" :
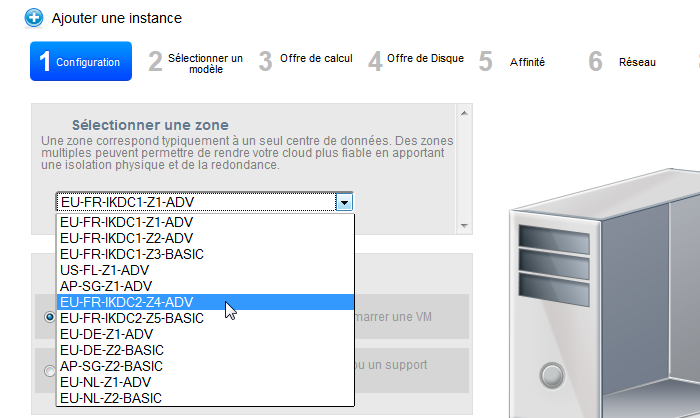
选择实例部署的区域 :
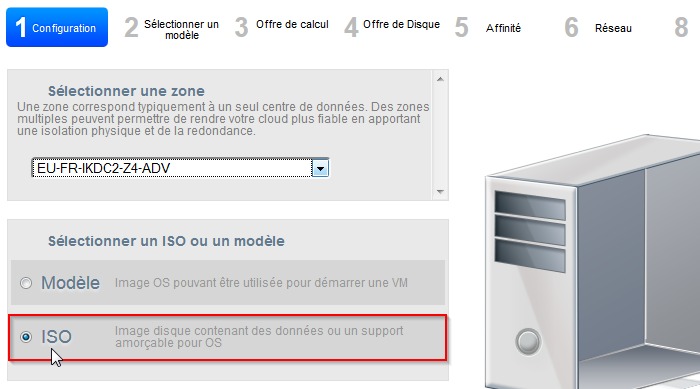
选择 ISO,然后单击 "下一个" :
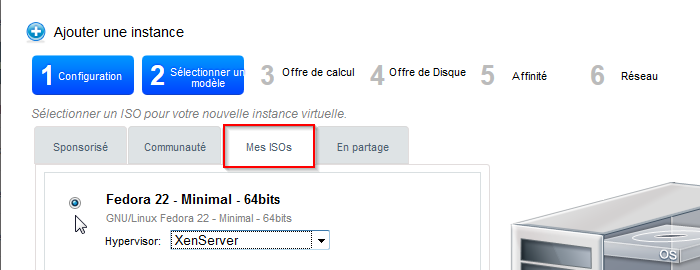
单击选项卡 "我 ISOs" 并检查您刚刚创建的 ISO :
选择您所选择的计算报价,然后单击 "下一个" :
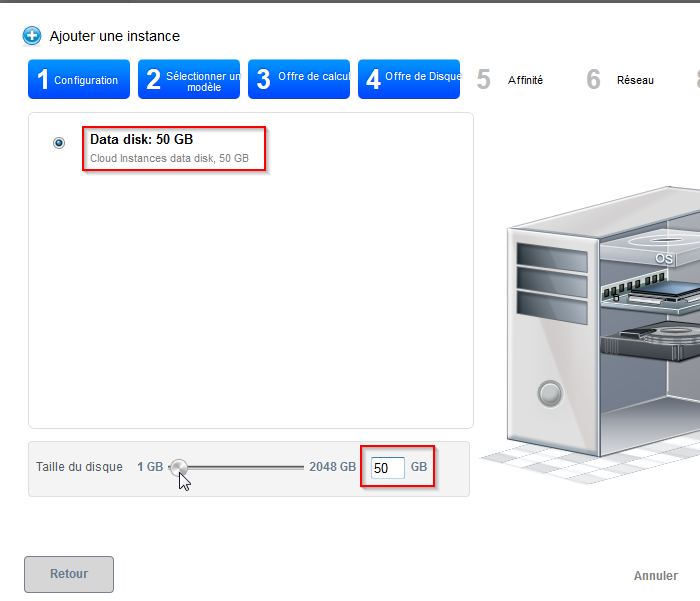
拖动滑块以获得磁盘的大小 (在英国) 您要为您的实例,因此为你的未来模型或输入的大小 (在英国) 在字段中手动和验证与键 "条目" 在你的键盘,使选择要显示在上面描述的大小 :
单击 "下一个" :
继续经典的步骤的部署实例 (亲和网络,实例名称) 通过点击 "下一个" 在每个时间来验证,最后对 "启动虚拟机".
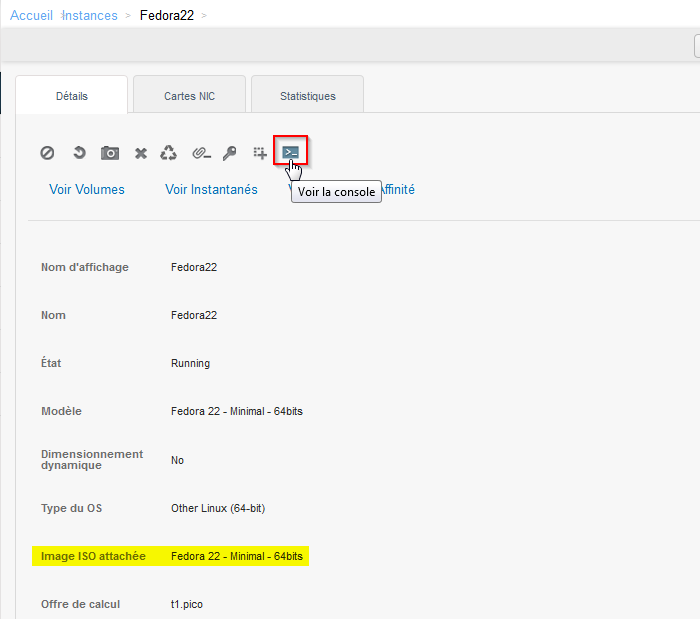
一旦部署,您的实例的名称,单击 (从实例菜单) :
单击按钮 "请参阅控制台" (请注意,你看到你的 ISO 映像附加到您的实例在细节的这) :
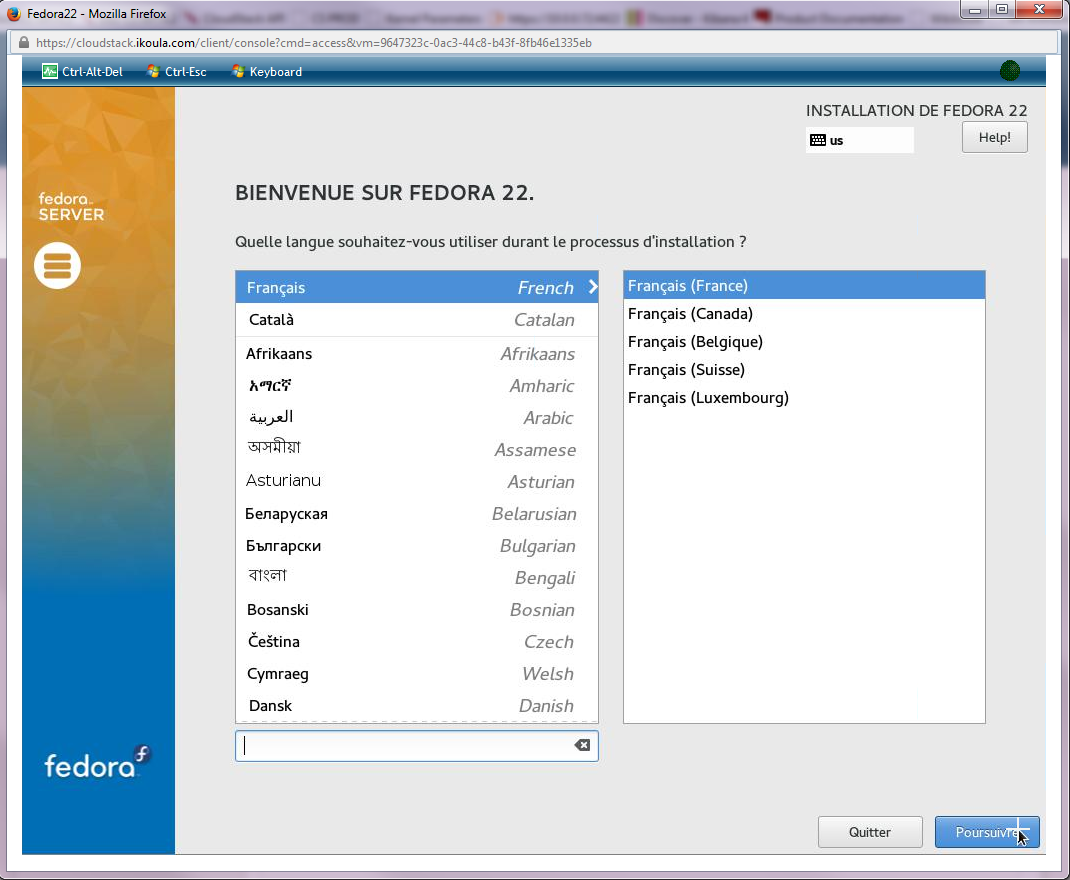
将打开一个新的弹出浏览器窗口 (如果这不是你不阻止的弹出窗口的云 Ikoula 接口的案件检查).此窗口实际上是 web 图形控制台类型 VNC/KVM (écran/clavier/souris) 您将允许您在您的实例的磁盘上安装系统的实例 :
继续您的系统分区和你想要的配置与安装 (如果要求,安装 SSH 包)但是请注意,键盘是 qwerty 键盘类型 (因此,提防密码的定义).
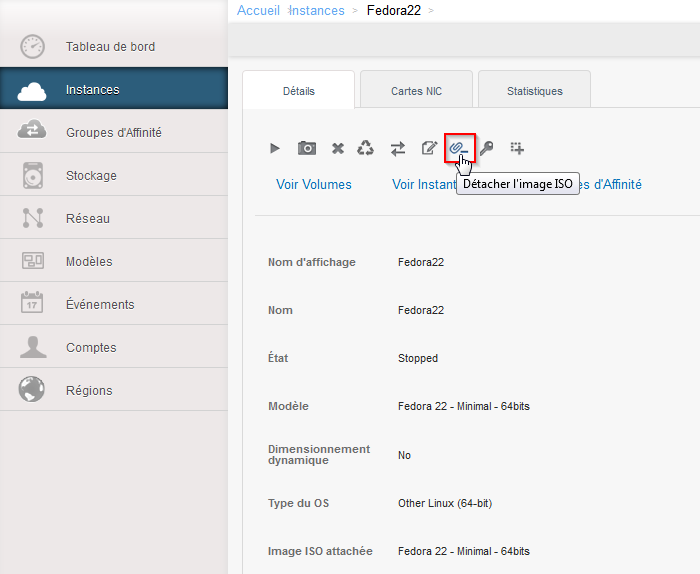
在安装时它被问到你结束单击重新启动时,停止您的实例分离 ISO
一旦您的实例停止,请单击您的实例,然后按钮的名称 "分离的 ISO 镜像" :
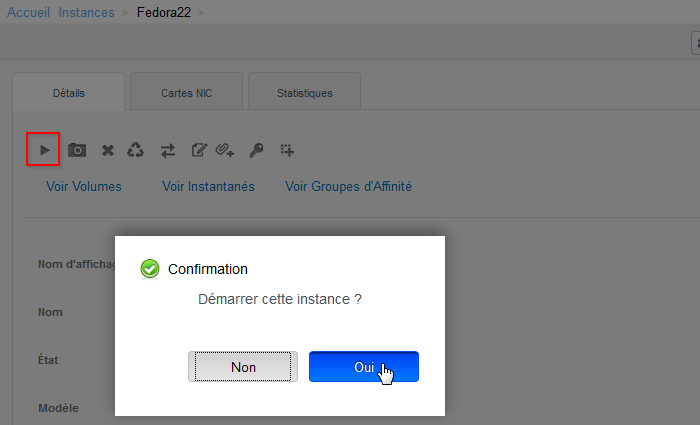
ISO 一次脱离您的实例,您可以启动它才能开始在系统上安装的磁盘 (ROOTDISK) 答案是后者。
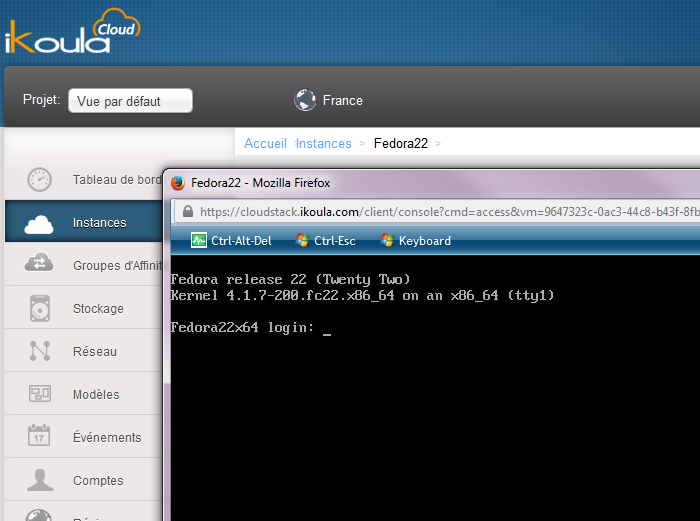
单击按钮 "请参阅控制台" 看到您的系统启动 :
在 SSH 连接到您的实例 (您必须创建一个规则削火和重定向的端口,如果你实例所在的地区/先进的网络 或组的入站的规则 安全 如果它是在基本的区域和没有规则 iptables 实例系统上) 要完成配置系统,使其与兼容。{Cloud public}}.
作为一个虚拟的上下文,我们依赖于使用 LVM 分区 (LVM 根和交换) 所以你可以轻易调整大小调整大小或添加虚拟磁盘分区 :
[root@Fedora22x64 ~]# fdisk -l
Disque /dev/xvda : 50 GiB, 53687091200 oct和s, 104857600 secteurs
Unités : secteur de 1 × 512 = 512 octets
Taille de secteur (logique / physique) : 512 octets / 512 octets
taille d'E/S (minimale / optimale) : 512 octets / 512 octets
Type d'étiquette de disque : dos
Identifiant de disque : 0xa1c87ad9

Périphérique Amorçage  Début       Fin  Secteurs Taille Id Type
/dev/xvda1               2048      4095      2048     1M 83 Linux
/dev/xvda2   *           4096   1955839   1951744   953M 83 Linux
/dev/xvda3            1955840 104857599 102901760  49,1G 8e LVM Linux


Disque /dev/mapper/vg01-root : 48,1 GiB, 51610910720 octets, 100802560 secteurs
Unités : secteur de 1 × 512 = 512 octets
Taille de secteur (logique / physique) : 512 octets / 512 octets
taille d'E/S (minimale / optimale) : 512 octets / 512 octets

Disque /dev/mapper/vg01-swap : 1 GiB, 1073741824 octets, 2097152 secteurs
Unités : secteur de 1 × 512 = 512 octets
Taille de secteur (logique / physique) : 512 octets / 512 octets
taille d'E/S (minimale / optimale) : 512 octets / 512 octets
[root@Fedora22x64 ~]# pvs
  PV         VG   Fmt  Attr PSize  PFree
  /dev/xvda3 vg01 lvm2 a--  49,07g    0
[root@Fedora22x64 ~]# vgs
  VG   #PV #LV #SN Attr   VSize  VFree
  vg01   1   2   0 wz--n- 49,07g    0
[root@Fedora22x64 ~]# lvs
  LV   VG   Attr       LSize  Pool Origin Data%  Meta%  Move Log Cpy%Sync Convert
  root vg01 -wi-ao---- 48,07g
  swap vg01 -wi-ao----  1,00g
如果需要,更新系统 (定制您的软件包管理器) :
[root@Fedora22x64 ~]# dnf upgrade
请安装至少包可能是有用的在设置中运行命令 "UserData" 在部署到与您的模型实例 : Vim,rsync,卷曲,wget。 云计算-init,傀儡因素 :
[root@TM-Fedora22KB ~]# dnf install vim-enhanced rsync curl wget cloud-init puppet facter
Vérification de l'expiration des métadonnées effectuée il y a 0:00:27 sur Thu Nov 26 12:32:31 2015.
Le paquet rsync-3.1.1-6.fc22.x86_64 est déj自 installé, ignorer
Le paquet curl-7.40.0-7.fc22.x86_64 est déjà installé, ignorer
Le paquet wget-1.16.3-1.fc22.x86_64 est déjà installé, ignorer
Dépendances résolues.
===============================================================================================================================================================================================================================================================================
Paquet Architecture Version Dépôt Taille
===============================================================================================================================================================================================================================================================================
Installation de :
PyYAML x86_64 3.11-9.fc22 updates 168 k
cloud-init x86_64 0.7.6-3.fc22 fedora 434 k
facter x86_64 2.4.1-1.fc22 fedora 105 k
gpm-libs x86_64 1.20.7-6.fc22 fedora 36 k
hiera noarch 1.3.4-3.fc22 updates 29 k
libselinux-ruby x86_64 2.3-10.fc22 updates 135 k
libyaml x86_64 0.1.6-6.fc22 fedora 58 k
puppet noarch 4.1.0-5.fc22 updates 1.2 M
python-configobj noarch 5.0.5-2.fc22 fedora 65 k
python-jsonpatch noarch 1.2-5.fc22 fedora 19 k
python-jsonpointer noarch 1.9-2.fc22 updates 17 k
python-prettytable noarch 0.7.2-4.fc22 fedora 42 k
ruby x86_64 2.2.3-44.fc22 updates 74 k
ruby-augeas x86_64 0.5.0-6.fc22 fedora 28 k
ruby-irb noarch 2.2.3-44.fc22 updates 93 k
ruby-libs x86_64 2.2.3-44.fc22 updates 2.9 M
ruby-shadow x86_64 1.4.1-26.fc22 fedora 18 k
rubygem-bigdecimal x86_64 1.2.6-44.fc22 updates 86 k
rubygem-io-console x86_64 0.4.3-44.fc22 updates 56 k
rubygem-json x86_64 1.8.3-100.fc22 updates 65 k
rubygem-pathspec noarch 0.0.2-2.fc22 updates 17 k
rubygem-psych x86_64 2.0.8-44.fc22 updates 85 k
rubygem-rdoc noarch 4.2.0-44.fc22 updates 481 k
rubygem-rgen noarch 0.6.6-2.fc21 fedora 84 k
rubygems noarch 2.4.8-100.fc22 updates 269 k
rubypick noarch 1.1.1-4.fc22 updates 11 k
vim-common x86_64 2:7.4.827-1.fc22 updates 6.0 M
vim-enhanced x86_64 2:7.4.827-1.fc22 updates 1.1 M
vim-filesystem x86_64 2:7.4.827-1.fc22 updates 22 k
Résumé de la transaction
===============================================================================================================================================================================================================================================================================
Installation 29 Packages
Taille totale des téléchargements : 14 M
Taille d'installation : 45 M
Est-ce correct [o/N] : o
- 添加行 "datasource_list: ['CloudStack']" 在配置文件的开头 /等/云计算/云计算.cfg (如果你已经安装了 云计算-如上所示的初始化) :
[root@fedora22 ~]# head -n1 /etc/cloud/cloud.cfg
datasource_list: ['CloudStack']
现在你可以启动 XenTools 的安装。为此,您可以按照以下文章: Installation_des_XenTools_sur_une_instance_CloudStack.
Attention ne rebootez pas votre machine après l'installation dex XenTools contrairement à ce qu'indique l'article.
我们添加到下列行 /etc/sysctl.conf (我们禁用 IPv6 并应用一些优化) :
#Disable IPv6
net.ipv6.conf.all.disable_ipv6 = 1
net.ipv6.conf.default.disable_ipv6 = 1
net.ipv6.conf.lo.disable_ipv6 = 1
net.ipv6.conf.eth0.disable_ipv6 = 1

#Disable Swap
vm.swappiness = 0

#Improve memory management
vm.dirty_ratio = 60
vm.dirty_background_ratio = 2
#No overcommitment of available memory
vm.overcommit_ratio = 0
vm.overcommit_memory = 0

#Set maximum amount of memory allocated to shm to 256MB
kernel.shmmax = 268435456
kernel.shmall = 268435456

#Keep at least 64MB of free RAM space available
vm.min_free_kbytes = 65535
然后我们执行命令 "sysctl -p" :
[root@Fedora22x64 init.d]# sysctl -p
net.ipv4.conf.all.arp_notify = 1
net.ipv6.conf.all.disable_ipv6 = 1
net.ipv6.conf.default.disable_ipv6 = 1
net.ipv6.conf.lo.disable_ipv6 = 1
net.ipv6.conf.eth0.disable_ipv6 = 1
vm.swappiness = 0
vm.dirty_ratio = 60
vm.dirty_background_ratio = 2
vm.overcommit_ratio = 0
vm.overcommit_memory = 0
kernel.shmmax = 268435456
kernel.shmall = 268435456
vm.min_free_kbytes = 65535
SELinux 政策有所改变,要把钱花在 "强制执行" à "许可" :
[root@Fedora22x64 ~]# sed -i 's/SELINUX=enforcing/SELINUX=permissive/g' /etc/sysconfig/selinux
[root@Fedora22x64 ~]# setenforce Permissive
[root@Fedora22x64 ~]# sestatus
SELinux status:                 enabled
SELinuxfs mount:                /sys/fs/selinux
SELinux root directory:         /etc/selinux
Loaded policy name:             targeted
Current mode:                   permissive
Mode from config file:          enforcing
Policy MLS status:              enabled
Policy deny_unknown status:     allowed
Max kernel policy version:      29
如果您的系统已削减原光的规则,请停止并禁用它,在我们的案例 :
[root@Fedora22x64 ~]# systemctl stop firewalld.service
[root@Fedora22x64 ~]# systemctl disable firewalld.service
Removed symlink /etc/systemd/system/dbus-org.fedoraproject.FirewallD1.service.
Removed symlink /etc/systemd/system/basic.target.wants/firewalld.service.
我们检查加载是更多的规则 :
[root@Fedora22x64 ~]# iptables -vnL
Chain INPUT (policy ACCEPT 34 packets, 2240 bytes)
 pkts bytes target     prot opt in     out     source               destination

Chain FORWARD (policy ACCEPT 0 packets, 0 bytes)
 pkts bytes target     prot opt in     out     source               destination

Chain OUTPUT (policy ACCEPT 32 packets, 3568 bytes)
 pkts bytes target     prot opt in     out     source               destination
我们现在将安装脚本 云计算 依赖的功能的客人更改密码、 主机名、 userdata,SSH 密钥 :
- 首先我们使用 wget 命令的镜子上得到脚本 (编辑软呢帽22 由 centos7debian8 或 ubuntu1404 在下面的 URL) :
wget http://mirror02.ikoula.com/priv/citrix/scripts/systemd/fedora22/systemd/cloud-set-guest-hostname.service -P /lib/systemd/system/
wget http://mirror02.ikoula.com/priv/citrix/scripts/systemd/fedora22/systemd/cloud-set-guest-password.service -P /lib/systemd/system/
wget http://mirror02.ikoula.com/priv/citrix/scripts/systemd/fedora22/systemd/cloud-set-guest-sshkey.service -P /lib/systemd/system/
wget http://mirror02.ikoula.com/priv/citrix/scripts/systemd/fedora22/systemd/cloud-set-guest-userdata.service -P /lib/systemd/system/
wget http://mirror02.ikoula.com/priv/citrix/scripts/systemd/fedora22/init.d/cloud-set-guest-hostname -P /etc/init.d
wget http://mirror02.ikoula.com/priv/citrix/scripts/systemd/fedora22/init.d/cloud-set-guest-password -P /etc/init.d
wget http://mirror02.ikoula.com/priv/citrix/scripts/systemd/fedora22/init.d/cloud-set-guest-sshkey -P /etc/init.d
wget http://mirror02.ikoula.com/priv/citrix/scripts/systemd/fedora22/init.d/cloud-set-guest-userdata -P /etc/init.d
- 我们激活我们服务单位 :
[root@Fedora22x64 ~]# systemctl enable cloud-set-guest-hostname.service
Created symlink from /etc/systemd/system/multi-user.target.wants/cloud-set-guest-hostname.service to /usr/lib/systemd/system/cloud-set-guest-hostname.service.
[root@Fedora22x64 ~]# systemctl enable cloud-set-guest-password.service
Created symlink from /etc/systemd/system/multi-user.target.wants/cloud-set-guest-password.service to /usr/lib/systemd/system/cloud-set-guest-password.service.
[root@Fedora22x64 ~]# systemctl enable cloud-set-guest-sshkey.service
Created symlink from /etc/systemd/system/multi-user.target.wants/cloud-set-guest-sshkey.service to /usr/lib/systemd/system/cloud-set-guest-sshkey.service.
[root@Fedora22x64 ~]# systemctl enable cloud-set-guest-userdata.service
Created symlink from /etc/systemd/system/multi-user.target.wants/cloud-set-guest-userdata.service to /usr/lib/systemd/system/cloud-set-guest-userdata.service.
[root@Fedora22x64 ~]# systemctl -l | grep cloud-set
  cloud-set-guest-hostname.service                                                          loaded active exited    CloudStack Set Guest Hostname
  cloud-set-guest-password.service                                                          loaded active exited    CloudStack Set Guest Password Reset
  cloud-set-guest-sshkey.service                                                            loaded active exited    CloudStack Set Guest Ssh Key
  cloud-set-guest-userdata.service                                                          loaded active exited    CloudStack Set Guest Userdata
- 我们清除 DHCP 租约文件 (要适应需要的文件的路径和名称) :
[root@fedora22 ~]# > /var/lib/dhclient/dhclient.leases
- On retire la ligne MACADDR du fichier /etc/sysconfig/network-scripts/ifcfg-eth0 (同样,以适应您的分布).
[root@fedora22 ~]# grep -v ^MACADDR ifcfg-eth0 > ifcfg-eth0.tmp && rm -f ifcfg-eth0 && mv ifcfg-eth0.tmp ifcfg-eth0
- 我们清除主日志文件和命令历史记录 :
[root@Fedora22x64 ~]# list=`find /var/log/ -type f`
[root@Fedora22x64 ~]# for arg in $list ; do > $arg ; done
[root@Fedora22x64 ~]# list=`find /var/log/ -name "*.gz"`
[root@Fedora22x64 ~]# for arg in $list ; do /bin/rm $arg ; done
[root@Fedora22x64 ~]# > .bash_history
[root@Fedora22x64 ~]# history -c && shutdown -h now && exit
- 我们创建停止我们实例的模型 :
在云 Ikoula 界面上,请转到 "实例" 然后点击你的实例的名称
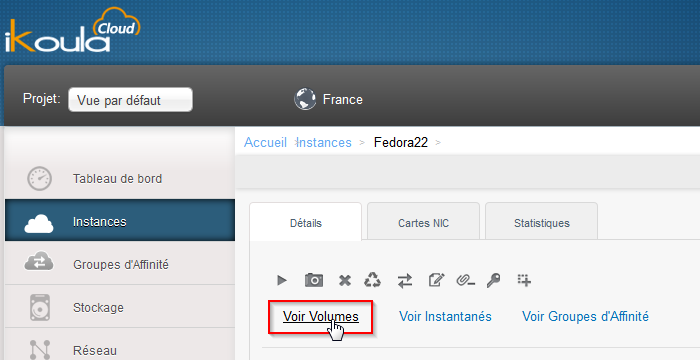
单击 "请参阅卷" :
单击您的卷 ROOTDISK 的名称 :
单击按钮 "创建模板" :
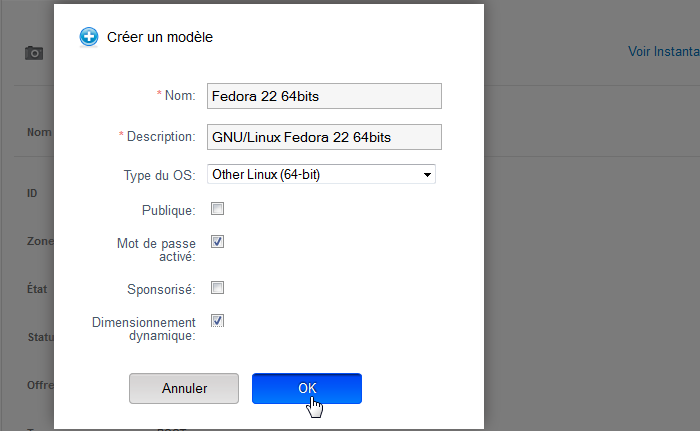
给的名称和你想要向您的模型,说明选择相同类型的骨比您的实例,请检查 "启用密码" et "动态调整大小" (如果你已经分别设置了脚本 云计算-设置来宾密码和安装 xentools) :
你的模型的创建完毕后 :
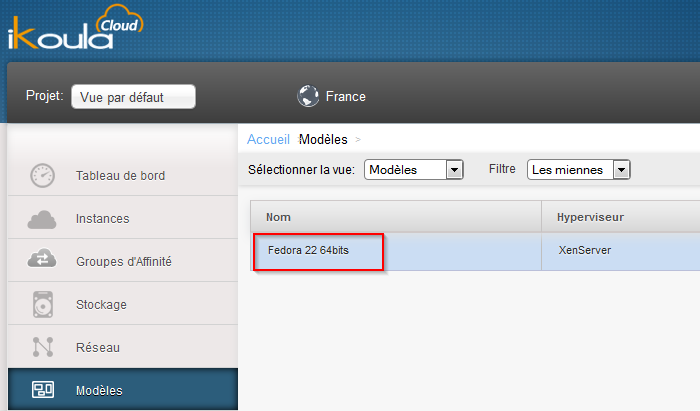
你可以找到它在 "模型" :
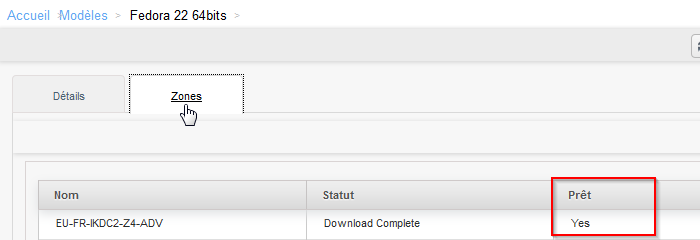
单击您的型号名称,然后单击选项卡 "地区" 要验证其状态准备好了 (贷款 : 是的) :
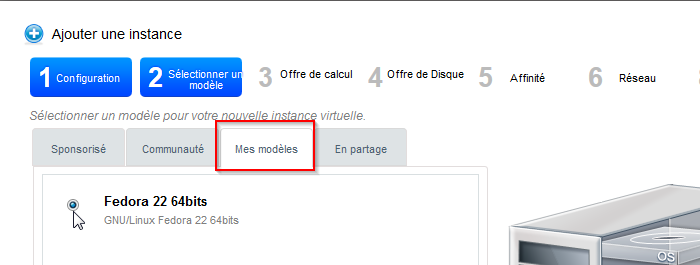
现在可以将新实例部署与您的兼容模式 公共云 (您将需要在选项卡中选择您的型号 "我的模特" 该向导部署实例) :
这篇文章似乎对你有用 ?







开启评论自动刷新